Home

Download

Buy Now

Tutorials

Contact US

How to Setup Windows XP from USB drive?

You are here:  Tutorials > How to setup Windows XP from USB drive?


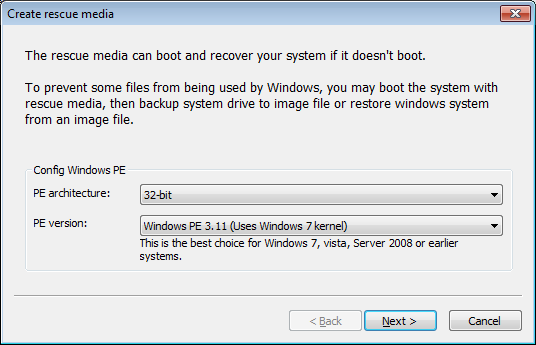
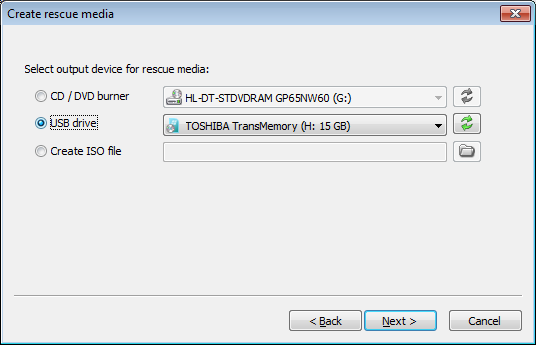
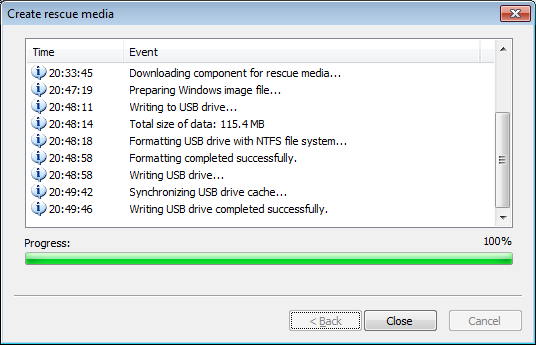
Step1: Creating Rescue USB Drive

First, we need create a rescue USB drive which can boot the computer. Please follow the steps,

  1. Run PowerISO rescue media utility. You can download it here. On Windows Vista or above operating system, you may need confirm the UAC dialog to continue.

  2. Insert the USB drive you intend to boot from.

  3. The utility will allow you choose Windows PE architecture and version. It is suggested to select 32-bit architecture and Windows PE 3.11. Click "Next" to continue.

  4. Select USB drive for output device, and select the correct drive from the list. Click "Next" to continue.

  5. The utility will start creating rescue USB drive. It will check necessary component and automatically download missing component from the server. 

    Please notice that all existing data on the USB drive will be destroyed during this step. The program will alert you before writing the USB drive. Click "OK" to continue.

  6. When it's done, copy the Windows XP setup files to the USB drive. Please note that you'll only need the i386 folder. 

If no errors occurred in the above process, you should now be all set to setup Windows XP from USB drive!


Step 2: Configuring the BIOS

You should now reboot and go into the BIOS configuration to boot from USB. Instructions for doing so vary wildly from system to system, but generally entail the following:

  1. Reboot the system.

  2. While booting (before Windows starts loading), get into the BIOS configuration screen by hitting something like F1, F2, Delete or Escape. Hotkey instructions are generally provided on the screen.

  3. Go to the section that contains your boot devices.

  4. With your USB drive plugged in, the USB drive should be listed. If it isn’t, your system might not support booting from USB. Assuming that it is supported (as is the case with virtually all modern hardware), promote your USB drive to the primary boot device.

  5. Exit from the BIOS configuration, saving all changes.

Please notice that you can seriously screw up your system by providing incorrect BIOS settings!


Step 3: Booting from rescue USB drive

Assuming that you properly configured your BIOS and your USB drive supports booting, your computer should now boot from the the rescue USB drive. Depending on the speed of your USB drive, this may take a while.

If it isn’t working, then double-check the following before making a scene:

  • Is your BIOS properly configured for booting from the USB device? (Is the USB device listed and does it have top priority?)

  • Have you correctly prepared the USB drive in step one? (Restart the procedure.)

  • Does your USB drive properly support being booted from? (Try another one!)


Step 4: Prepping the Hard Disk

You need to make sure that your hard drive is partitioned and formatted properly. Especially if you've had Linux or some other operating system on it, you'll need to repartition and format it. The rescue drive contain file manager and command line utility. You can launch DiskPart for disk partitioning and formatting from the command utility.

If you are sure that your hard drive is set up properly (i.e. it has only run Windows, it contains a valid FAT or NTFS partition) then you can safe yourself the hassle and skip this step.

Window XP doesn't support GPT partition. If your hard drive is partitioned in GPT mode, you also need repartition and format the disc.

To repartition and format (This procedure will destroy any data on the hard drive):

  1. Click the icon on task bar to launch a command line Window.

  2. Enter DiskPart to run the built-in disk management utility.

  3. Enter the commands needed to repartition and format your drive. For example, try the following: 

select disk 0 (select the first disk. On your computer, disk 0 may not be the correct disk, you can use "list disk" to find the correct disk.)

clean (purges the entire drive, essentially resetting it)

create partition primary (creates a single partition from the entire disk)

select partition1 (select the partition created)

format fs=ntfs quick (format the partition to NTFS system, and do a quickly format)

assign (assign the partition a drive letter)

exit (quits DiskPart).


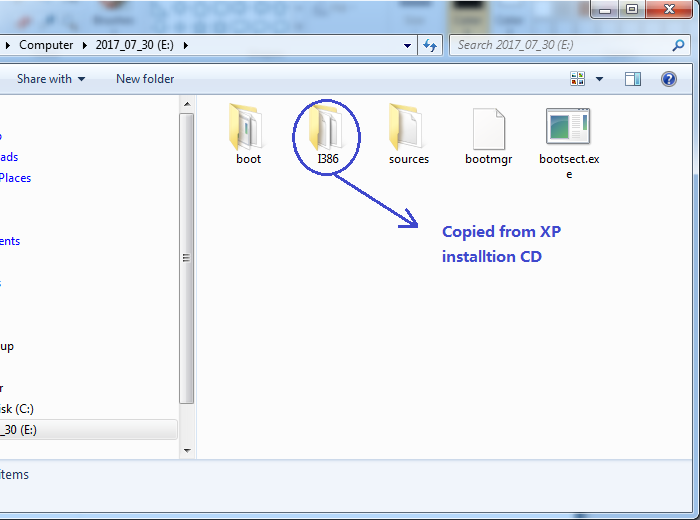
Step 5: Launching Windows XP Setup from USB drive

With your drive all ready, you can now launch the Windows XP setup with a few custom parameters. Let's assume that the files are available at E:\i386.

Plugging in a device now won’t work. Remember that all USB devices will need to be plugged in right from the start while using the rescue drive.

Run the following command:

  1. Run E:\i386\winnt32.exe /syspart:C: /tempdrive:C: /makelocalsource. Replace C: with the drive you want to install Windows to.

  2. Proceed with the installation. If asked to convert the installation volume to NTFS, answer No. The setup program incorrectly believes that your USB drive (if is formatted as FAT) needs conversion.

The setup program will then silently close, which might make you think that something went wrong. Don't worry though.


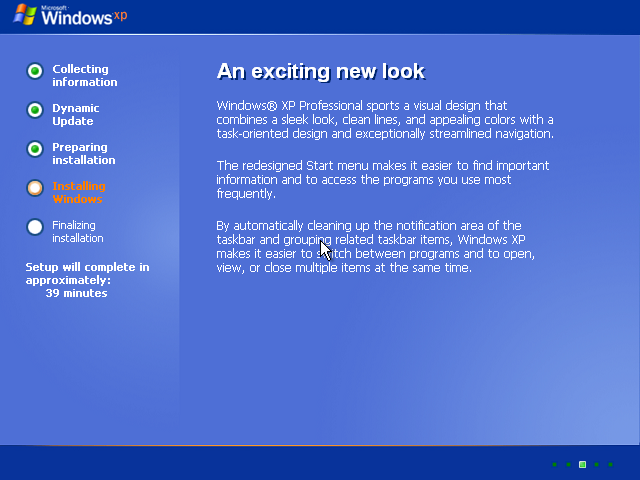
Step 6: Continue Windows XP Setup from Hard disk

  1. Reboot your system.

  2. Unplug USB drive during post stage.

  3. Change your BIOS settings back to boot from hard disk again as needed.

  4. You can now continue to finish setting up Windows XP.


Note: The above guide works with Windows XP only. For Windows 10, Windows 7, Windows 8 / 8.1, or Windows Vista operating systems, please refer to another guide at https://www.poweriso.com/tutorials/how-to-make-win7-bootable-usb-drive.htm .


Copyright 2004-2024 Power Software Ltd. All rights reserved.